Welcome to Life Through Bifocals

Life is not always clear and easy to figure out. So grab a cup of coffee and your bifocals and let's see what we can see.

Showing posts with label Frugal. Show all posts

Tuesday, January 20, 2015

Favorite Soup


Do you have a favorite soup?  I don't have a favorite. I just like soup on the days when it's cold, freezing rain, lot's of snow, or otherwise just way too nasty to go out.   This week, it was turkey soup.

Soup is just of of those meals that whatever is in the freezer, fridge or even in a can in the cubboard, it all goes into the crockpot and it all blends perfectly into one yummy soup. It must be the crockpot, right?  It works magic!  I like that.

We still had turkey in the freezer from Thanksgiving.  So in the crockpot it went.  To that I added some veggies that were in our freezer, corn, green beans and onions.  To that I added celery, carots, and spices.  Some chicken broth rounds out the soup recipe.  It cooks all day and fills the house with yummy aromas.  Now we had some wonderful Cranberry-Orange-Walnut-Bread that was made for us by a friend and so as the rain came down, and froze to the ground, we had a nice bowl of turkey soup and bread and stayed warm and dry.

What are you making this week?

Monday, January 19, 2015

Freezing Rain Weekend!


So how was your weekend?  Here in the upper right hand corner of the Nation it was very cold but very nice on Saturday because at least the sun was out.  It was too cold to enjoy the outside but it was nice to see the sun streaming in the windows.

Sunday it was freezing rain.  The Patriot's played in the freezing rain and that is the kind of game where those of us at home watching the game are very glad that we are not AT the game in the freezing rain but rather we are home with hot cocoa and a fire going.  WAY TO GO PATS!!

Since I'm not a football fan (can I say that and still live in the North East?) I decided to craft.

I've been really admiring the place settings I've seen on Pinterest lately and really wanting napkins.  Not the paper ones that we buy for the holidays or birthdays but real cotton, cloth napkins.  But Oh My! the prices I saw on Amazon made my Scottish  blood boil over.  So into the fabric bins I went.

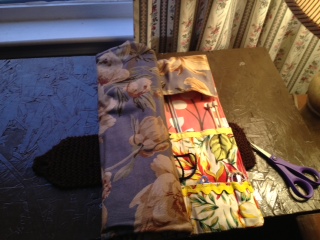
I think that a really good size napkin is at least 16 x 16 inches so all I needed was material that was at least that size.  I started cutting  my material and matching it up.  I cut the material 17 x 17 inches.  I figure as long as I'm making one why not back it with a matching fabric and then have have 2.


If you're using new material, make sure to wash, dry and iron it before you cut it up but I was using what I had on hand.  So it was already washed, dried and ironed.

With right sides together, sew all the way around the material, leaving  an opening in order to turn the material right side out.  

Clip corners, cut close to the edges and turn.  


 Then you can top stitch to give it a nice finished look.  Use either a matching or contrasting thread.  Once it's all sewed, fold into thirds and fold in half and you have a great napkin.


August decided to hold down the ones that were done.  He's good like that!


In all I got 8 two sided napkins which really means I have 16 napkins.  Make them to match your kitchen, match the season or holiday.  Use the material you love.  I made some Frozen ones for the grand girls.  They are never too young to learn about napkins. If you don't have material large enough for napkins, how about using Fat Quarters?  Since they come already matched up, according to color schemes, it would be easy to get several napkins out of them.  Think I have a reason to go to the fabric store now.

Did you craft this weekend, what did you do?

Friday, February 8, 2013

A Bit More Crafting - for Free


I enjoy knitting and crocheting. But all those needles can be really hard to keep track of. So one day I gathered all the material that I had and looked for something colorful.  It was winter and I really needed some color besides white.


The insides has 2 layers for storage. The shorter front pockets hold the crochet needles, tape measure, scissors, and a box of row markers. The top layer pockets hold the larger needles and ruler. The top folds up to make getting to those needles easier and velcros down to hold them in place when I'm not using them.

When I'm done I simply start on one end and beging to roll it up.

I takes 3 rolls to completely roll it up

And then I have knitted a band that buttons close and all the needles are inside and neatly stored. 

Again all the materials were on hand so it was free!  I've seen these cases in stores for $30.00.  I'm so glad that I learned to sew a long time ago.

What have you made lately?

Thursday, February 7, 2013

Crafting The God Box


The idea of a God Box has been around for a while. Mary Lou Quinian wrote the book "The God Box". A story about one woman's journey discovering her own mother through some 20 God boxes that she found after her's mother death. Little boxes where the mother placed prayers to God. Prayers for good health, the money to buy a house, help with dealing with a problem and dreams for her children. Placing them in the box symbolized to her the act of giving the request to God and forgetting about it.  I liked the idea.
Once the box and cover were made, the cover didn't fit on as it once did. I taped ribbon to the inside of the top and box and now they are connected. 
So I made myself a God Box.  Someplace to put the prayers that comes from the depths of my heart. Some place to see that I've "mailed" off my hopes for my husband, my kids, my grandkids.  A place to put my dreams, my struggles, my frears, my joys. A place where I write it down and then forget it.
The prayers don't have to be long, or eleganant, or for something very big - but they do have to be honest. Sometimes my prayers are simply "Help". I know that God knows what I need.

A Box where I put my dreams and God takes them out.
A Box where I know that He will see it and take care of it.
He will answer them in time.  He will send His peace and I can rest in His love for me.
My job is to send my prayers to Him. I'm pretty good at this part. I'm hoping that the Box will remind me to NOT take them back. I'm not so good at that part.

Have you ever heard of the God Box?  Did you read the book?


Tuesday, February 5, 2013

Crafting


Ever have one of those days when you feel creative and have the time to Craft?  This past Saturday was one of those days for me.  With Hubby out for a meeting, I had the house to myself. It was cold so both dogs were ready to curl up and let me craft.

I love my "Cricut" and I have a few cartridges but storing them is a problem.  I have to keep getting up and going to the book case to pull out the next cartridge.  I've seen those premade cartridge holders but oh my!! They are costly.  I knew there was something I could create.  So I took a 3 Ring binder, some nice paper, my Cricut and heavy weight pocket protectors.
Before
I used my Cricut to create a cover, something simple but in a green that matches my office.


The pocket protectors were sewed in 1/2 and a little dab of Velcro at the top and now the cartridge and overlay as well as the sheet of images can all fit inside and I can hold 2 cartridges per sheet.  By placing the sheet of images back to back, I can turn one protector over and see all the image's that I can make. Total cost was $1.59 for the 3 ring binder. I had everything else.


Then I made a craft for August. When I need to groom August, we are not always home so I wanted a small grooming kit ready in the car.  I had material from another project so I made this:


It holds the slicker brush, a comb, a small bottle of conditioner, and a mat splitter.  It all folds up and can fit in the car. So when I need to freshen him up, all the supplies are there. Total cost $0.00!

I also made a few cards. I love making cards. I love sending them as much as I love getting them.

Then I made a God Box?  I used a box that I already had and covered it. Once the paper was on the box it no longer closed the way it once did so I taped ribbon to the inside and now it opens and stays attached just fine.  I'll talk about the God Box in another post.
Total cost of the God Box $0.00
So after that I cooked, cleaned and watched TV.  What a great crafting day!  When did you have a crafting day and what did you make? I love when I have the time and the materials to craft.

Thursday, October 18, 2012

Making coffee go farther


One of the nice things about having these kinds of coffee makers is that everyone can have the coffee that they want.  Or the tea. Or the hot cocoa.  Anyhow, it seems to work for us.

Hubby got one of these shelve things to hold the coffee/tea/cocoa and I love it. It doesn't take up any more space than the coffeemaker and I don't have a lot of counter space so that is important to me. It also holds a lot.

See, it holds a total of 30 cups.  One of the bad things that I don't like about these coffee makers is the cost per cup. The coffee and tea is pretty strong and cost per cup can be as much as $.70 per cup. Hubby looks for sales and gets that cost down to $.50 per cup. Still, that is a lot for this Scottish lady.


 Our coffee maker has 3 options so this is what I do make it more cost efficient for us. I take the coffee of my choice and place it in the coffeemaker but instead of placing a coffee cup under it, I place this.

It's a large measuring cup and fits just right, then I press the largest cup possible  and brew that. Then I press the same cup size again and brew it again. And to make sure I get all the coffee possible out each K-cup I then press the smallest size last.  All the coffee is blended together, I add my cream and sweetener and  I get 2 full travel cups plus a little to have right away.  None of it is too strong, none of it is too weak, it's all "Just Right!"


I figure this way that $.70 per cup coffee is down to between $.23-$.24 each.

Now that makes my morning coffee worth it.

With the cost of everything going up - How do you save on everyday items? 

Thursday, March 15, 2012

Reusing those store bags


Last month I took part in the February Photo Challenge and one day the topic was "closet".  Being true to the challenge, I took this photo:

It's the shelf that I want to focus on so here is the just the shelf:

The shelf  was just covered with stuff and I really didn't like the looks of it so I went to work cleaning it out. I took out my 3 big bags and set them on the floor. The bags are marked "TOSS", "KEEP" and "GIVE". Within a few minutes all 3 bags were filled. The TOSS bag gets emptied right away in the out going trash and the bag itself goes back in storage. The GIVE gets emptied into my car and when I head out it gets dropped off  at Family Outfitters where it will once again finds a good home and gets used for its purpose.  The KEEP goes back on the shelf but I just didn't want to re-stack the shelf so here is what I did.

I went into the bag of bags and dug out those bags that came from stores where the store name and logo are on them. There is something about giving a gift in a Sears bag that takes away from the gift, but the bag I still have (I am Scottish remember). I pulled out a Sears bag, 2 Verizon bags, a Hallmark bag and a few others. Took the items that I wanted to keep and put them in the bags.  

Inside them are my visors, purses and other items that that I will use this summer and the shelf is clean, neat and better yet, no cost to me. 

Just some of my visors inside the bag
Another bag holds purses
The end result is a clean shelf in the now clean closet. Just wait till all those sweaters and sweatshirts get put away!!!Oh Yeah!

How about you, do you find a new use for those store bags?

Tuesday, July 12, 2011

Couponing Again

For Years I was faithful to couponing, then I got busy with life and with the price of gas going up it was harder to get around so staying at one store was just easier. A lot easier. I was lazy.

But it cost more.

A lot more.

Life has a way of coming full circle and with this economy, and changes here at home, it's important to rethink using coupons again.

I had a coupon book and it did work, but it needed to be tweaked so this weekend I did just that.

The Bible verse says; "She is like the merchant ships, bringing her food from afar." Proverbs 31:14

Inside there are pockets for each store I will visit and will hold both flyers and receipts.

Large clear pockets holds the coupons. Putting them back to back means I have coupons on both sides

I labeled each category rather than labeling the aisles since our stores like to move the food around often.

I added these foldable scissors to cut coupons as I found them.

They open up to small but practical pair and then close back up when not in use. 
I've been on line getting some coupons and using them. Last week I saved $15.79 in products. I know not a lot...baby steps here ladies, it's been a long time.

How do you organize your coupons? Do you have a plastic box to put them in? A binder like me, or something different? How many stores do you go to during the week? Do you hit them all at once or on different days of the week?

I'm also following and learning from Lorie over at  The Midlife Housewife. She is very talented so if you ever wanted to learn more about saving money,  heard on over to her blog for a lesson or two. And share your insights here. Please....Thank you.